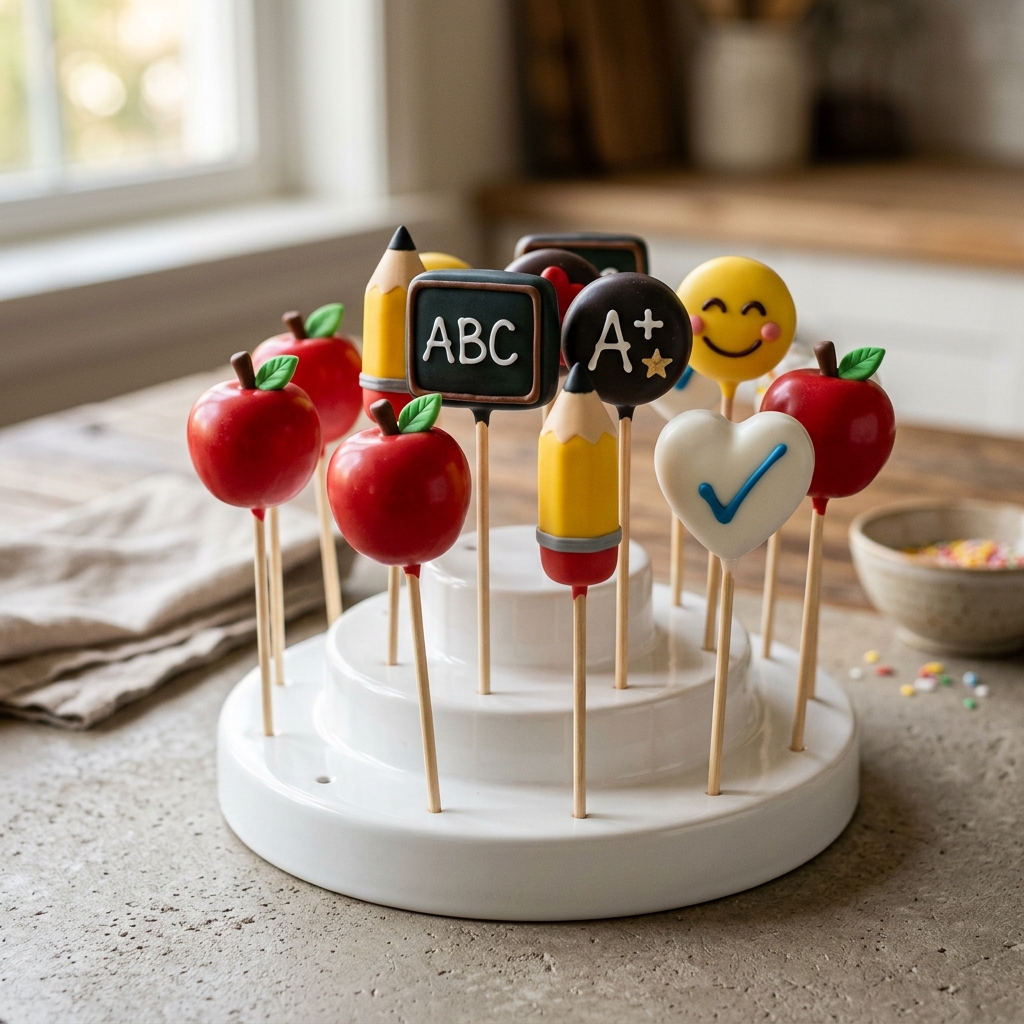
If you’re looking for a playful dessert idea to celebrate the new school year, these back to school cake pops are just the thing. I love making themed treats that feel extra special without needing a bakery order, and these cake pops are such a fun way to surprise your kids, teachers, or party guests. With bright colors, simple shapes, and a little creativity, you can turn basic cake pops into adorable school-inspired designs like apples, pencils, chalkboards, hearts, and happy faces.
What I really love about this tutorial is that you don’t need everything to look perfectly fancy for them to be completely charming. In fact, the homemade look is part of the fun. I’ll walk you through the basic cake pop method first, then show you how to decorate them so they match that cheerful back-to-school theme. Whether you’re making them for a first-day celebration, a classroom party, or just a weekend baking project with your kids, these are guaranteed to get smiles.
They do take a little time, but the steps are easy and very manageable when broken down. I like to make the cake and filling mixture ahead of time, then decorate the next day when I’m feeling relaxed. If you’ve ever wanted to try cake pops at home, this is such a cute and memorable place to start.
Quick Recipe Info Card
- Prep Time: 1 hour 15 minutes
- Cook Time: 30 minutes
- Total Time: 2 hours 45 minutes
- Servings: 20 cake pops
- Difficulty: Intermediate
Why You’ll Love It
- They’re perfect for first-day-of-school parties, teacher gifts, and lunchbox surprises.
- You can create several cute designs from one basic cake pop batch.
- The decorating is fun and easy to customize with your favorite school colors.
- They can be made ahead, which is so helpful for busy weeks.
- Kids love helping with dipping, sprinkles, and simple face details.
- They look impressive on a display stand but are made from straightforward ingredients.
Nutritional Benefits and Adaptable Variations
- Portion-friendly treat: Cake pops offer built-in portion control compared to slicing a large frosted cake.
- Customizable cake base: You can use vanilla, chocolate, or even funfetti cake depending on your preference.
- Easy allergy adjustments: Use a dairy-free frosting and dairy-free candy melts if needed, checking labels carefully.
- Color flexibility: Match decorations to school colors, classroom themes, or a teacher appreciation event.
- Design variations: Shape some into apples, keep some round for smiley faces, and make flatter pops for chalkboard or heart styles.
- Simple shortcut option: A boxed cake mix works beautifully here if you want to save time.
Ingredients
- For the cake pop base:
- 1 baked 9-inch cake, completely cooled (vanilla or chocolate)
- 1/2 cup prepared vanilla frosting
- For coating and decorating:
- 20 lollipop sticks
- 12 oz red candy melts
- 12 oz yellow candy melts
- 10 oz white candy melts
- 8 oz dark chocolate or dark cocoa candy melts
- 2 oz green candy melts
- 1 oz blue candy melts
- 1 oz orange candy melts
- 1 tablespoon vegetable shortening, as needed for thinning melts
- Black decorating gel or edible food marker for facial details
- White decorating icing for chalkboard details
- Small fondant pieces or extra candy coating for apple stems and leaves, optional
Step-by-Step Instructions
[INSERT PROCESS IMAGE HERE]
- Bake and cool the cake. Prepare your favorite 9-inch cake according to the recipe or box directions. Let it cool completely before starting. Warm cake will make the mixture too soft.
- Crumble the cake. Break the cooled cake into fine crumbs in a large mixing bowl. Remove any overly dark or firm edges if you want a smoother interior texture.
- Mix with frosting. Add the vanilla frosting a little at a time and stir until the crumbs hold together when pressed. The mixture should be moist but not sticky or wet.
- Shape the pops. Roll most of the mixture into smooth balls for smiley faces and letter pops. Shape some into apples by making a slightly rounded top with a gentle taper at the bottom. For pencil or chalkboard styles, flatten and mold portions into rectangles or long rounded shapes. Place all shapes on a parchment-lined tray.
- Chill. Refrigerate the shaped cake pops for about 20 to 30 minutes, until firm enough to dip without cracking apart.
- Prepare the sticks. Melt a small amount of candy coating and dip the tip of each lollipop stick into it. Insert each stick halfway into a cake shape. Return the tray to the refrigerator for 10 to 15 minutes so the sticks set firmly.
- Melt the coatings. Melt each candy color separately in microwave-safe bowls in short intervals, stirring often. If needed, thin with a little vegetable shortening until smooth and fluid for dipping.
- Dip the base colors. Dip each cake pop into the appropriate coating, tapping off excess gently. Use red for apples, yellow or red for pencils, dark coating for chalkboard or letter styles, white for hearts, and yellow for smiley face pops. Let them set upright in a cake pop stand or foam block.
- Add the second-layer details. Once the base coating is set, pipe or drizzle contrasting colors to create pencil tips and erasers, green leaves, brown stems, letters, check marks, smiley faces, and chalkboard-style details. Work slowly and let each layer set before adding another if needed.
- Finish and fully set. Allow the decorated cake pops to set completely at room temperature. Check that all details are firm before serving or packaging.
Tips, Serving Suggestions & Substitutions
- If your cake mixture feels too soft, chill it a bit longer before shaping. This makes a huge difference.
- Don’t add too much frosting. Start small and mix well so the centers stay truffle-like instead of mushy.
- If candy melts seem too thick, add just a tiny bit of vegetable shortening to loosen them.
- Let cold cake pops sit for a couple of minutes before dipping if your coating tends to crack from temperature shock.
- Use a spoon to help coat shaped pops like pencils or chalkboards if dipping feels awkward.
- Serve them in a white cake pop stand, tucked into a tray of sugar, or wrapped individually as party favors.
- You can swap vanilla frosting for chocolate frosting if you’re using a chocolate cake base.
- For easier decorating, make only two or three designs instead of the full themed assortment.
Nutrition Information
| Nutrient | Approximate Amount Per Cake Pop |
|---|---|
| Calories | 210 |
| Carbohydrates | 29 g |
| Protein | 2 g |
| Fat | 10 g |
| Saturated Fat | 7 g |
| Cholesterol | 12 mg |
| Sodium | 115 mg |
| Fiber | 1 g |
| Sugar | 22 g |
Nutrition values are estimates and will vary depending on the cake, frosting, and candy coatings you use.
Storage & Make-Ahead Tips
These cake pops are great for making ahead. Once fully set, store them in an airtight container in the refrigerator for up to 5 days. For the best texture, let them sit at cool room temperature for about 15 to 20 minutes before serving. If you’re stacking them, place parchment between layers to protect the decorations.
You can also make the cake and mix the filling a day ahead, then shape and decorate the next day. If you need longer storage, freeze undecorated shaped cake pops in an airtight container for up to 1 month. Thaw them in the refrigerator before dipping. For food safety, avoid leaving the finished cake pops out for extended periods in a warm room.
FAQ
1. Why are my cake pops falling off the stick?
This usually happens if the cake mixture is too soft or the stick wasn’t secured with melted coating first. Make sure the shaped pops are chilled and that each stick is dipped in melted candy before inserting.
2. Can I use boxed cake mix for these back to school cake pops?
Absolutely. A boxed cake mix is a great shortcut and works very well for cake pops. Just bake it, cool it completely, and continue with the recipe as written.
3. How do I get smooth candy coating?
Melt the candy slowly and stir often. If it’s too thick, add a very small amount of vegetable shortening. Tapping off the excess gently after dipping also helps create a smoother finish.
4. Which designs are easiest for beginners?
Round smiley faces, apple shapes, and simple letter pops are the easiest to start with. Pencil and chalkboard shapes are fun too, but they take a little more patience during shaping and decorating.
5. Can I make these for a classroom party?
Yes, they’re wonderful for classroom parties as long as your school allows homemade treats. It’s a good idea to package them individually and check for any allergy-related guidelines before sending them.
Final Thoughts
I think these back to school cake pops are one of the sweetest ways to celebrate a brand new school year. They’re cheerful, creative, and completely customizable, which makes them such a fun project whether you’re baking solo or with your kids. I especially love how they double as both dessert and decoration when displayed upright on a stand.
If you give them a try, I’d love to hear how your designs turned out. Leave a comment, share this tutorial with another mom or baking friend, and don’t forget to save it to Pinterest so you can come back to it for school parties, teacher appreciation days, and fun family baking afternoons.
Back To School Cake Pops Tutorial - Moms & Munchkins
Equipment
- 1 9-inch cake pan
- 1 Large mixing bowl
- 1 baking sheet or tray lined with parchment paper
- 20 lollipop sticks
- 1 microwave-safe bowls for melting candy coatings
- 1 spatula or spoon
- 1 cake pop stand or foam block for drying
Ingredients
Cake Pop Base
- 1 9-inch baked cake completely cooled, vanilla or chocolate
- 1/2 cup vanilla frosting prepared
Coating and Decorations
- 20 lollipop sticks
- 12 oz red candy melts
- 12 oz yellow candy melts
- 10 oz white candy melts
- 8 oz dark chocolate or dark cocoa candy melts
- 2 oz green candy melts
- 1 oz blue candy melts
- 1 oz orange candy melts
- 1 tbsp vegetable shortening as needed for thinning melts
- 1 black decorating gel or edible food marker for facial details
- 1 white decorating icing for chalkboard details
- 1 fondant pieces or extra candy coating optional, for apple stems and leaves
Instructions
Make the Cake Pop Base
- Bake a 9-inch cake according to the recipe or package directions, then let it cool completely.
- Crumble the cooled cake into fine crumbs in a large mixing bowl.
- Mix in the vanilla frosting a little at a time until the crumbs hold together when pressed and the mixture is moist but not wet.
- Shape the mixture into a variety of forms: round balls, apple shapes, and simple pencil or chalkboard shapes. Place them on a parchment-lined tray.
- Refrigerate the shaped cake pops for 20 to 30 minutes until firm.
Add Sticks and Coat
- Melt a small amount of candy coating. Dip the tip of each lollipop stick into the melted coating and insert it halfway into each chilled cake pop.
- Return the tray to the refrigerator for 10 to 15 minutes so the sticks set firmly.
- Melt each candy color separately in microwave-safe bowls, stirring often, and thin with a little vegetable shortening if needed.
- Dip each cake pop into the appropriate base color coating, tapping off the excess gently. Set the pops upright in a stand or foam block to dry.
Decorate the School-Themed Designs
- Use contrasting candy melts, decorating icing, or gel to add details such as pencil tips and erasers, apple leaves and stems, letters, check marks, smiley faces, and chalkboard accents.
- Let the decorations set fully before serving or packaging.