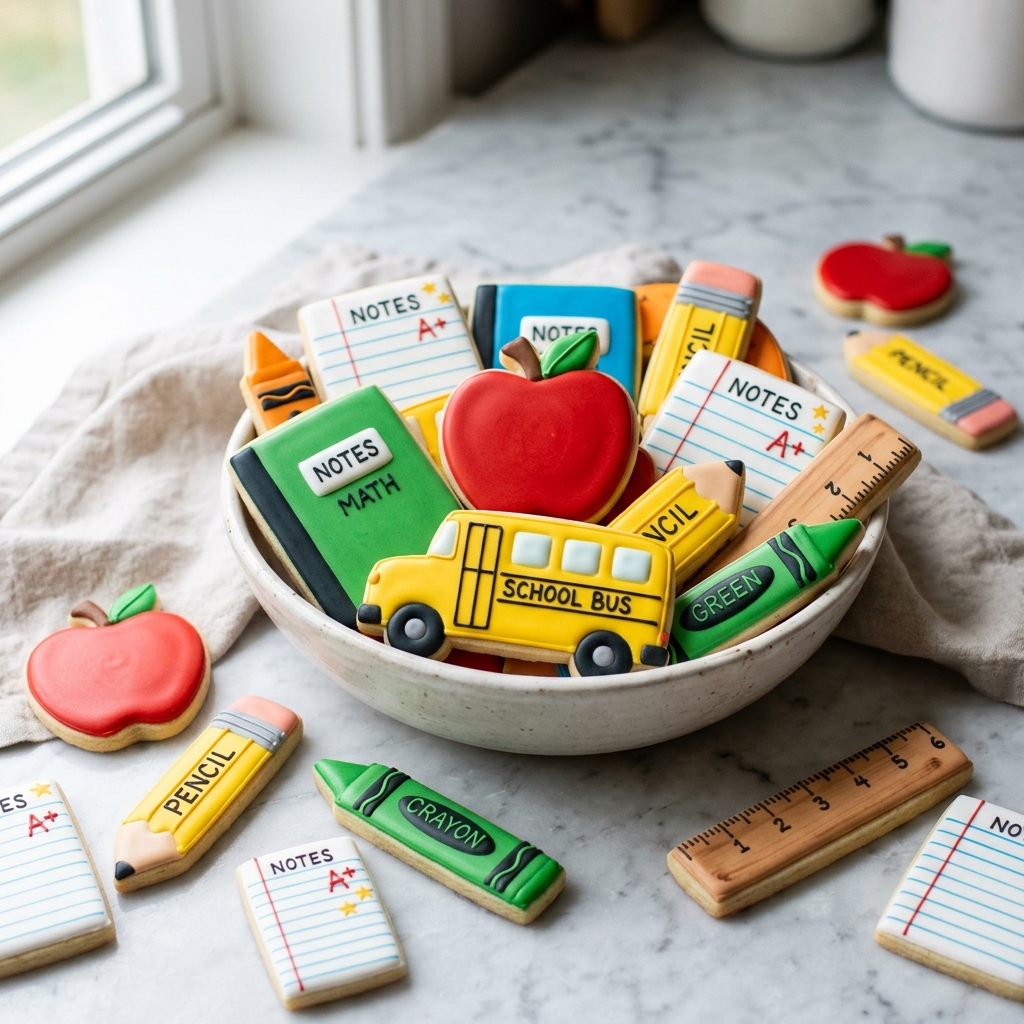
There is something so cheerful about making back to school cookies right before a new school year begins. I love turning a simple batch of sugar cookies into bright little edible school supplies like pencils, apples, notebooks, buses, and crayons. They instantly make the kitchen feel festive, and they are such a sweet way to celebrate first-day jitters, lunchbox notes, teacher gifts, or an easy family baking afternoon.
If you have ever wanted to make decorated cookies without feeling intimidated, this is a wonderful place to start. I am keeping the shapes playful and recognizable, and I will walk you through the dough, the royal icing, and the decorating process in a way that feels doable. You do not need perfection here. You just need a little time, a few bold icing colors, and a willingness to have fun with it.
These cookies are buttery, lightly sweet, and sturdy enough for decorating, which makes them ideal for family projects. I especially love making them with kids because everyone can choose a favorite design and add their own personality. Even if your ruler cookie is a little wobbly or your apple has a funny leaf, they still come out adorable and delicious.
Quick Recipe Info Card
- Prep Time: 45 minutes
- Cook Time: 10 minutes
- Total Time: 115 minutes
- Servings: 24 cookies
- Difficulty: Intermediate
Why You’ll Love It
- Perfect for first-day-of-school parties, lunchbox treats, and teacher appreciation.
- The sugar cookie base holds its shape beautifully when baked.
- Royal icing dries smooth and glossy for that classic decorated-cookie look.
- You can customize the colors and shapes to match your family’s style.
- It is a fun baking and decorating activity to do with kids.
- The finished cookies look impressive but use simple techniques.
- They make a charming homemade gift packed in a cookie box or cellophane bag.
Nutritional Benefits and Adaptable Variations
- These are definitely a treat, but homemade cookies let you control the ingredients and portion size.
- You can make smaller cookies for mini snack-size portions.
- Use natural food coloring if you prefer to avoid artificial dyes.
- Swap vanilla extract for almond extract in the dough for a bakery-style flavor twist.
- Add a touch of lemon extract to the icing for a brighter finish.
- If you need a simpler version, decorate with fewer colors and choose easy shapes like apples and pencils.
- For parties, you can turn the same dough into round cookies and use school-themed icing details on top.
Ingredients
For the Sugar Cookies
- 3 cups all-purpose flour
- 1 teaspoon baking powder
- 1/2 teaspoon salt
- 1 cup unsalted butter, softened
- 1 cup granulated sugar
- 1 large egg
- 2 teaspoons vanilla extract
- 1/2 teaspoon almond extract
For the Royal Icing
- 4 cups powdered sugar
- 3 tablespoons meringue powder
- 6 to 8 tablespoons warm water, plus more as needed
- 1 teaspoon vanilla extract
For Decorating
- Gel food coloring in red, yellow, green, blue, orange, and black
- Extra powdered sugar or water as needed to adjust icing consistency
Step-by-Step Instructions
[INSERT PROCESS IMAGE HERE]
- Make the dough. In a medium bowl, whisk together the flour, baking powder, and salt. In a large bowl, beat the softened butter and granulated sugar until light and fluffy. Beat in the egg, vanilla extract, and almond extract. Add the dry ingredients and mix just until a soft dough forms.
- Chill the dough. Divide the dough into two discs, wrap them well, and refrigerate for at least 30 minutes. This makes the dough easier to roll and helps the cookies keep their shape.
- Prep for baking. Preheat your oven to 350°F. Line baking sheets with parchment paper. Lightly flour your work surface.
- Roll and cut. Roll one disc of dough at a time to about 1/4-inch thickness. Cut into school-supply-inspired shapes like apples, pencils, notebooks, buses, crayons, rulers, and paper rectangles. Re-roll scraps as needed.
- Bake the cookies. Place the cut cookies on the prepared baking sheets, leaving a little space between them. Bake for 8 to 10 minutes, or until the edges are just set and the tops look matte. Do not overbake if you want a tender cookie.
- Cool completely. Let the cookies rest on the baking sheet for 5 minutes, then transfer them to a wire rack. Cool fully before decorating so the icing sets properly.
- Mix the royal icing. In a large bowl, beat the powdered sugar, meringue powder, warm water, and vanilla extract until smooth and thick, about 3 to 5 minutes. The icing should hold a soft peak. Divide it into separate bowls.
- Color the icing. Tint the icing with gel food coloring to make red, yellow, green, blue, orange, black, and white icing. Keep bowls covered with a damp towel or plastic wrap so the icing does not dry out.
- Adjust consistency. Keep one portion of each color slightly thicker for outlining. Thin the rest with a few drops of water at a time until it flows smoothly for flooding. A ribbon of icing should settle back into itself in about 10 to 15 seconds.
- Outline the cookies. Transfer the icing to piping bags or small zip-top bags with tiny corner snips. Pipe outlines on each cookie shape first. For example, outline apples in red, notebooks in green or blue, pencils in yellow with pink erasers and black tips, and buses in yellow with black windows and wheels.
- Flood and decorate. Fill in the outlined areas with thinned icing. Use a toothpick to guide icing into corners and pop air bubbles. Let the base colors set for 15 to 20 minutes before adding details like notebook lines, ruler marks, bus windows, crayon wrappers, or apple stems and leaves.
- Dry fully. Leave the decorated cookies at room temperature for several hours or overnight until the icing is fully set before stacking or packaging.
Tips, Serving Suggestions & Substitutions
- Roll the dough evenly so your cookies bake at the same rate and create a smooth surface for icing.
- If the dough gets too soft while you work, chill it again for 10 to 15 minutes.
- Use parchment paper to prevent sticking and help the cookies bake evenly.
- If you are new to royal icing, start with simple designs like apples, lined paper, or pencils before trying buses and rulers.
- A toothpick is your best friend for tiny corrections and spreading icing into corners.
- Serve these cookies on a first-day-of-school dessert board with fruit, milk, or hot chocolate.
- Package a few cookies in clear treat bags for teachers, classmates, or neighbors.
- You can substitute lemon extract for almond extract if you prefer a brighter flavor.
- If you want a softer icing finish, use a simple glaze instead of royal icing, though the details will be less crisp.
- For a quicker version, use one base icing color and add simple accent lines once the cookies have dried a bit.
Nutrition Information
| Serving Size | Calories | Carbohydrates | Protein | Fat | Saturated Fat | Sodium | Sugar |
|---|---|---|---|---|---|---|---|
| 1 cookie | 180 | 28 g | 2 g | 7 g | 4 g | 65 mg | 18 g |
Nutrition values are approximate estimates and can vary depending on cookie size, icing amount, and decorating details.
Storage & Make-Ahead Tips
Once the icing is fully dry, store the cookies in an airtight container at room temperature for up to 5 days. Place parchment paper between layers if needed, although fully set royal icing usually stacks well. For the best texture, keep them in a cool, dry spot away from humidity.
You can make the dough up to 2 days ahead and refrigerate it tightly wrapped. The baked undecorated cookies can also be made 1 to 2 days in advance and stored in an airtight container before icing. If you want to work even further ahead, freeze the undecorated cookies for up to 2 months and thaw at room temperature before decorating.
Royal icing is best used the day it is made, but you can keep it tightly covered for a short period if needed. Stir well before using, and never decorate cookies that are still warm.
FAQ
1. Do I need special cookie cutters for these designs?
No, not necessarily. You can use basic shapes and trim them with a small knife. Rectangles, ovals, and circles can easily become notebooks, pencils, rulers, apples, and school buses with a little creativity.
2. How do I know when my royal icing is the right consistency?
For flooding, the icing should smooth out in about 10 to 15 seconds after you drizzle some back into the bowl. For outlining, it should be thicker and hold its shape without spreading too quickly.
3. Can I make these back to school cookies without meringue powder?
You can use another royal icing method, but meringue powder is convenient, stable, and easy for home bakers. If using an alternative, be sure to follow safe handling guidance for the ingredient choice.
4. How long do decorated cookies need to dry?
Most cookies need several hours to dry fully, and overnight is often best if you plan to stack or package them. Humidity can slow drying, so give yourself extra time if your kitchen is warm or damp.
5. Can kids help decorate these cookies?
Absolutely. I recommend that adults handle the baking and any detailed piping first, then let kids help flood larger areas, add simple lines, or choose color combinations. It is a fun and memorable family project.
Final Thoughts
If you are looking for a cheerful baking project to kick off the school season, these cookies are such a fun choice. They are colorful, creative, and full of personality, and I love how they turn an ordinary sugar cookie into something that feels truly celebratory. Whether you make a whole tray for a party or just a few simple shapes with your kids, the process is every bit as enjoyable as the final result.
If you try them, I would love to hear how your designs turned out. Leave a comment, share the recipe with a friend, and save it to Pinterest so you can come back to it every school year.
Colorful School Supplies Cookies for Family Fun
Equipment
- 2 mixing bowls one large and one medium
- 1 electric mixer hand or stand mixer
- 1 Rolling Pin
- 2 baking sheets
- 1 parchment paper for lining sheets
- 1 wire cooling rack
- 1 Whisk
- 1 piping bags or small zip-top bags
- 1 toothpicks for spreading icing and popping bubbles
Ingredients
For the Sugar Cookies
- 3 cups all-purpose flour
- 1 teaspoon baking powder
- 1/2 teaspoon salt
- 1 cup unsalted butter softened
- 1 cup granulated sugar
- 1 large egg
- 2 teaspoons vanilla extract
- 1/2 teaspoon almond extract
For the Royal Icing
- 4 cups powdered sugar
- 3 tablespoons meringue powder
- 6 to 8 tablespoons warm water plus more as needed
- 1 teaspoon vanilla extract
For Decorating
- 1 set gel food coloring red, yellow, green, blue, orange, and black
- 1 small amount extra powdered sugar or water to adjust icing consistency
Instructions
Make the Sugar Cookies
- Whisk together the flour, baking powder, and salt in a medium bowl.
- In a large bowl, beat the softened butter and granulated sugar until light and fluffy.
- Beat in the egg, vanilla extract, and almond extract.
- Add the dry ingredients and mix just until a soft dough forms.
- Divide the dough into two discs, wrap well, and refrigerate for at least 30 minutes.
- Preheat the oven to 350°F and line baking sheets with parchment paper.
- Roll one disc of dough at a time on a lightly floured surface to about 1/4-inch thickness.
- Cut the dough into school-supply-inspired shapes such as apples, pencils, notebooks, buses, crayons, rulers, and paper rectangles.
- Place the cookies on the prepared baking sheets and bake for 8 to 10 minutes, until the edges are just set and the tops look matte.
- Cool on the baking sheet for 5 minutes, then transfer to a wire rack and cool completely.
Make and Color the Royal Icing
- Beat the powdered sugar, meringue powder, warm water, and vanilla extract until smooth and thick, about 3 to 5 minutes.
- Divide the icing into bowls and tint with gel food coloring to make red, yellow, green, blue, orange, black, and white icing.
- Keep some icing thicker for outlines and thin the remaining icing with a few drops of water at a time until it settles smooth in 10 to 15 seconds.
Decorate the Cookies
- Transfer the icing to piping bags or small zip-top bags with tiny corner snips.
- Pipe outlines on the cooled cookies first, matching colors to the school-supply shapes.
- Flood the outlined sections with thinned icing and use a toothpick to spread icing into corners and pop air bubbles.
- Let the base icing set for 15 to 20 minutes, then add details such as notebook lines, ruler marks, bus windows, crayon wrappers, or apple stems and leaves.
- Leave the decorated cookies at room temperature for several hours or overnight until the icing is fully set before stacking or packaging.