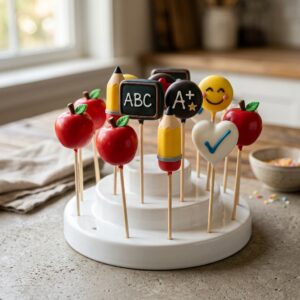
Back To School Cake Pops Tutorial - Moms & Munchkins
Fun school-themed cake pops decorated like apples, pencils, chalkboards, hearts, and smiley faces for back-to-school parties and celebrations.
Equipment
- 1 9-inch cake pan
- 1 Large mixing bowl
- 1 baking sheet or tray lined with parchment paper
- 20 lollipop sticks
- 1 microwave-safe bowls for melting candy coatings
- 1 spatula or spoon
- 1 cake pop stand or foam block for drying
Ingredients
Cake Pop Base
- 1 9-inch baked cake completely cooled, vanilla or chocolate
- 1/2 cup vanilla frosting prepared
Coating and Decorations
- 20 lollipop sticks
- 12 oz red candy melts
- 12 oz yellow candy melts
- 10 oz white candy melts
- 8 oz dark chocolate or dark cocoa candy melts
- 2 oz green candy melts
- 1 oz blue candy melts
- 1 oz orange candy melts
- 1 tbsp vegetable shortening as needed for thinning melts
- 1 black decorating gel or edible food marker for facial details
- 1 white decorating icing for chalkboard details
- 1 fondant pieces or extra candy coating optional, for apple stems and leaves
Instructions
Make the Cake Pop Base
- Bake a 9-inch cake according to the recipe or package directions, then let it cool completely.
- Crumble the cooled cake into fine crumbs in a large mixing bowl.
- Mix in the vanilla frosting a little at a time until the crumbs hold together when pressed and the mixture is moist but not wet.
- Shape the mixture into a variety of forms: round balls, apple shapes, and simple pencil or chalkboard shapes. Place them on a parchment-lined tray.
- Refrigerate the shaped cake pops for 20 to 30 minutes until firm.
Add Sticks and Coat
- Melt a small amount of candy coating. Dip the tip of each lollipop stick into the melted coating and insert it halfway into each chilled cake pop.
- Return the tray to the refrigerator for 10 to 15 minutes so the sticks set firmly.
- Melt each candy color separately in microwave-safe bowls, stirring often, and thin with a little vegetable shortening if needed.
- Dip each cake pop into the appropriate base color coating, tapping off the excess gently. Set the pops upright in a stand or foam block to dry.
Decorate the School-Themed Designs
- Use contrasting candy melts, decorating icing, or gel to add details such as pencil tips and erasers, apple leaves and stems, letters, check marks, smiley faces, and chalkboard accents.
- Let the decorations set fully before serving or packaging.
Notes
Do not overmix the frosting into the cake crumbs or the pops can become too soft. Chill shaped pops before dipping for the best results. Thin candy melts with a little vegetable shortening if needed. Let decorated pops set fully before stacking or packaging.